
If you asked someone who has never practiced yoga to name a yoga pose, chances are it will be downward dog. In this article, I share the incredible benefits of this famous asana, along with detailed instructions for how to practice it safely and correctly step by step.
Aside from serving as a warm-up, transition, and stand-alone posture, the downward dog works the entire body, stretching and strengthening many muscles. That's why I often tell my students, “If you only have time to practice one yoga pose, make it this one!”
And whatever your level, I've got your back, as I'm sharing my favorite beginner and advanced modifications for Adho Mukha Svanasana.
Article content:
(Click any link below to jump directly to section)
How to do downward facing dog step-by-step
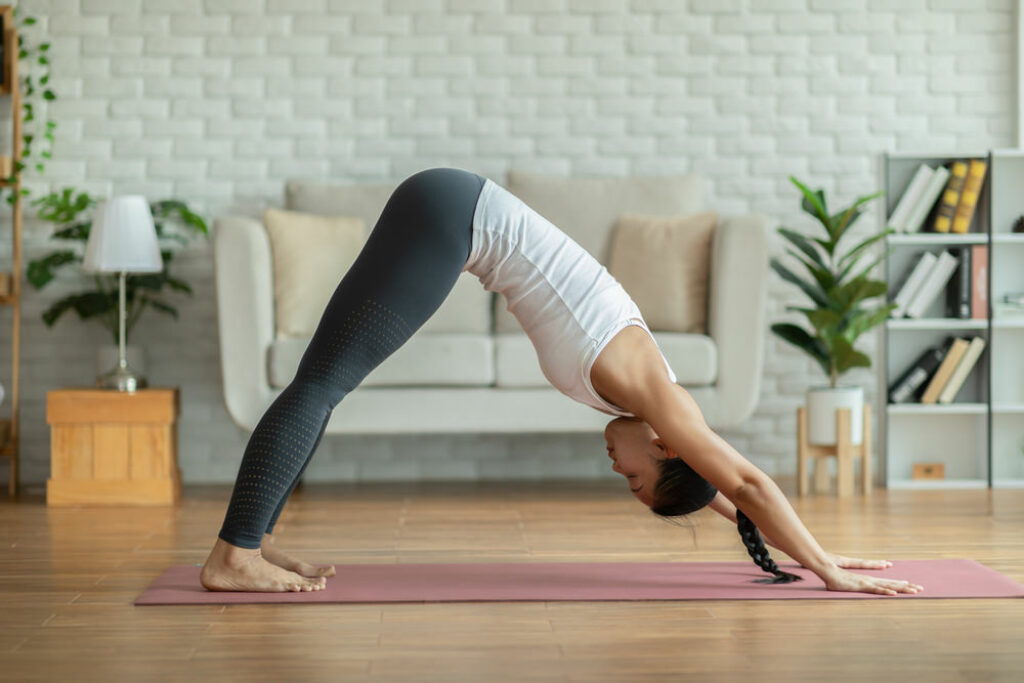
While downward dog is not a challenging posture, you want to practice correct alignment. Here's how to do downward facing dog step-by-step:
- Start in a tabletop position on your hands and knees. Your knees should be directly under the hips, and your hands should be directly under the shoulders.
- Spread your fingers, with the index finger pointing to the top of the mat. Press the palms firmly into the mat.
- Tuck your toes under, and on an exhale, engage your core to lift your knees off the ground, and push your hips back.
- Keep your arms straight and press your chest towards your thighs.
- Try to straighten your legs as you press your heels towards the ground (it's ok if they don't touch the floor!) If your hamstrings are tight, keep a slight bend in the knees to avoid rounding the spine.
- Relax your head between your arms, gazing in between your feet. Your ears should be in line with your upper arms.
- Focus on lengthening the spine by extending your tailbone toward the ceiling. You should have equal weight in your arms and legs.
- Keep your arms, shoulders, core, and quad muscles engaged as you hold the pose for 5 to 10 slow and deep breaths.
3 beginner downward facing dog variations
If you're new to yoga and struggle to hold downward dog or cannot do the full version comfortably, try one of these three beginner modifications:
1. Puppy pose
If you have weak or sensitive wrists or lack upper body strength, a more gentle alternative to the downward dog is puppy pose. You practice this posture in a kneeling position, so there is no weight on your arms and wrists, yet it still gives a beautiful stretch to the spine and shoulders.

2. Bent knees
The most common downward dog modification for beginners is to keep the knees bent. I recommend this modification to anyone with tight hamstrings or calves, as muscle tightness in the legs can cause roundness in the back (which is not what you want).
Bent knees are also a good modification for any yogi to take during their first downward dog of the day. The first time you come into the pose, your muscles are still fairly cold, so you may not have full range of motion.
3. Wall down dog
Another way to lessen the load on the upper body is to do downward dog against the wall. This will still give the shoulders, back, and legs an excellent stretch. Follow these steps to do a wall down dog modification:
- Face the wall and place your hands roughly shoulder height and width apart.
- Walk your feet away from the wall as you lean forward.
- Avoid arching your back – keep your spine straight and press your hips back.
2 advanced downward facing dog variations
As the downward dog is a pose you practice in EVERY yoga class, once you become an experienced practitioner, you can start to find this asana boring and easy. Luckily, there are ways to make it more challenging and exciting. Here are my two favorite advanced modifications for downward facing dog:
1. 3-legged dog
To strengthen your downward dog, lift one leg as high as possible, pointing the toes toward the ceiling. This will place additional weight on the other three limbs, working the muscles more.
To try this bring both feet closer together. Then, raise one leg for five breaths, release, and lift the other leg.

2. Revolved downward dog
This variation adds a twisting element to the asana, which increases the strengthening properties and aids digestion. To do this revolved down dog modification:
- Shift your weight into your right arm, grounding the hand firmly.
- Lift the left hand and reach towards your right ankle or calve, grabbing it from the outside.
- Gently pull on your leg to deepen the twist, turning your chest to the right.
- Hold for a few breaths, and then repeat with the left hand.
5 benefits of downward facing dog
Downward facing dog offers many benefits, including a complete body stretch and strength -building yoga pose. Here are five benefits of this popular yoga posture:
- Deeply stretches the leg muscles -Targets the hamstrings, calves, and Achilles tendon, lengthening all these muscles and reducing tightness and tension.
- Strengthens the upper body – Builds strength in the shoulders, arms, wrists, and hands. It also helps you prepare for more advanced inversions and arm balances.
- Improves spinal health – Stretches and elongates the spine, which helps to reduce back pain. It also opens the chest and shoulders, which helps to improve posture.
- Boosts energy levels – As an inverted yoga pose, it promotes blood circulation throughout the body and brain. It also stimulates the nervous system, helping you feel more alert and energized.
- Reduces stress – Releases tension in the neck, shoulders, and upper back (areas where stress is stored) and helps to lower stress levels by clearing mental fog.

Downward dog 101 – the basics
- Who this yoga pose is for: Beginner – advanced
- Pose type: Inversion
- Targets: Legs, upper body, spine
- Stretches: Back muscles and legs, specifically the hamstrings, calves, and quadriceps.
- Strengthens: Upper body, particularly the deltoids, triceps, and shoulder girdle.
Sanskrit & English name
- Sanskrit: ‘Adho Mukha Svanasana.' It consists of four words, each of which has a specific meaning:
- Adho = downward
- Mukha = facing
- Svana = dog
- Asana = pose/posture
- English: ‘Downward facing dog,' but many yoga teachers will call it ‘downward dog‘ for short.
How to pronounce Adho Mukha Svanasana
The correct pronunciation of Adho Mukha Svanasana is “AH-doh MOO-kah sva-NAH-suh-nuh.” Note that the words in capital letters are the syllables you should emphasize the most. Here's the phonetic breakdown of each word:
- Adho – The “A” is pronounced like the “u” in “cut,” and “dho” rhymes with “toe.”
- Mukha – The “u” is pronounced like the “oo” in “food,” and “kha” is pronounced as in “khaki.”
- Svanasana – The “sva” sounds like “swa” with a soft “v,” “NAH” rhymes with “ma,” and “suh-nuh” is pronounced with emphasis on the “suh” and a soft “nuh” at the end.
Contraindications for downward facing dog
Despite being a beginner-friendly pose, downward facing dog is unsuitable for some people. You should avoid this posture if you have:
- Recent knee, shoulder, ankle, or wrist injuries
- Recent surgery on any internal organ
- Carpal tunnel syndrome
You should also practice caution and avoid holding this asana for too long if you have high blood pressure.
Why I love this yoga pose
I love Adho Mukha Svanasana because it’s a fantastic full-body stretch. It warms up and engages numerous upper and lower body muscles while helping to reduce tension and tightness.
Although I have done more downward dogs over the years than I could estimate, I still practice it in every yoga session and include it in my warm-ups and cool-downs when working out.
Takeaway on downward facing dog
Downward dog is a highly accessible and beneficial pose for yogis of all levels. It stretches the entire body, builds strength, and is a gentle introduction to inversions.
It's also a posture for any occasion. In the morning, the downward dog helps to wake you up, while in the evening, it clears the mental fog that accumulates throughout the day.
Some online yoga studios, online yoga teacher training programs, and brands that we write about may offer us a small commission should you decide to make a purchase or signup after reading our content. Thank you for enabling us to exist!


